I often forget that details about an artist’s work can be fascinating to others, even if they seem mundane and boring to the artist who has spent years developing a process. So, today I had to remind myself that even though I haven’t completed new paintings in the past couple of weeks, I do still have something interesting to share with you.

I’ve been working on a huge and time-consuming project–rounding up and varnishing all the unvarnished paintings in my possession.

Up until this year, whether my paintings leave my studio varnished or not has been hit-or-miss. The reason for this is the conventional rule that a painting cannot be varnished until at least 6 months after it’s finished. You can see how this would be highly impractical for an artist who creates lots of paintings and either sells them directly to new owners or sends them out to galleries as a matter of routine. You’d have to wait 6 months before even making a piece of art available to the public by posting a photo online! I don’t think I have either the organization skills or the patience to live with such delays. However, I’ve always held the policy that I will varnish any of my past paintings free of charge if an owner requests it.
A few months ago when I attended a painters’ conference that included a talk and demonstration by a rep for Gamblin Oils, I learned that their varnish, called Gamvar, can be applied as soon as the painting is dry–so, for artists in all but the most humid climates, this means waiting 2-3 weeks at the most, which is much more doable than 6 months! So now, I’ve made the decision that from now on, no painting will leave my home or studio without first being varnished.

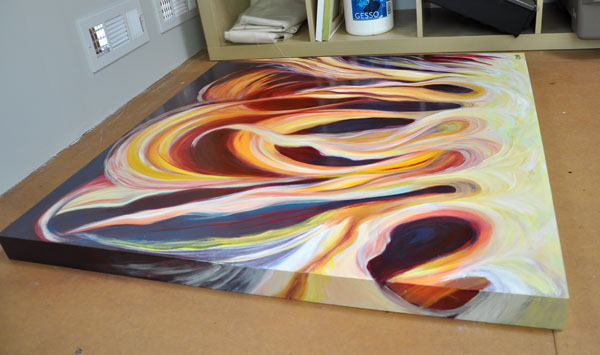
At the moment I’m working on varnishing so many paintings at once that every available surface in my studio is covered with paintings in various stages of drying–I’ve even been using the rafters of my ceiling for this purpose!

Varnishing an oil painting gives its surface a more even look–if you have some experience painting in oils, you’ll probably be familiar with the way some colors (often dark colors, blacks, blues, browns) leave matte patches in an otherwise glossy painting. Perhaps even more importantly, varnishing a painting protects it for posterity. Picture this. 100 years down the line: the painting has been hung on various walls in different homes, and has been exposed to humidity, cigarette smoke, and a century of accumulated dust, dander and general filth. If the painting has been varnished, someone experienced in art restoration can remove the varnish without damaging the painting underneath, revealing the original brilliant colors and textures, and then re-varnish it easily enough. If the painting has not been varnished, all of that accumulated filth will have molecularly bonded with the paint, permanently degrading the image.
When varnishing any painting, there’s an important step that must not be skipped: an isolation coat, or a protective layer of something in between the paint and the varnish. This will ensure, that, in the hypothetical future event that the art will be restored after your lifetime, that when the varnish is someday removed the painting itself will remain untouched by whatever solvent the restorer uses to remove the varnish.

For oil paintings, the isolation coat is just a thinned layer of oil, and the process is referred to by oil painters as “oiling out.” Oiling out is a good idea even if you don’t plan to varnish the painting, because even without varnish, it provides a layer of protection as well as creating an even level of glossiness over the whole surface.
To “oil out,” you need a mixture of half oil medium, half solvent–in my case, I use a 50/50 blend of Gamblin’s Galkyd Lite and Gamblin’s Gamsol. Using a large bristle brush (I usually use a house-painting brush from the painting aisle of the hardware store) I brush a thin, even coat of this mixture onto the whole surface of the painting, then wait 2-3 days for it to dry before varnishing. (I’d probably wait longer, up to a week or more, in a cold/wet climate, but I happen to be working in a hot/dry climate.)

The varnish can then be applied in the same fashion–careful to apply a very thin, even coat, I usually do 2 coats, waiting at least a day in between coats.
The process is similar but much quicker when varnishing acrylic paintings. I painted only in acrylics for several years before switching to oils, and back then, for my isolation coat I used Golden’s glossy soft gel medium. Normally this product is mixed straight into the paint to make the pigment go farther and to create texture by making a thicker paint. But when using it for an isolation coat, you must thin the medium–2 parts medium to 1 part water. It appears milky when brushed onto the painting, but in about 10 minutes, it dries completely clear. My favorite varnish for acrylic paintings is Golden’s MSA gloss varnish. Warning: the fumes are very toxic and if you’re sensitive to chemicals you may want to steer clear of this product, but the results are gorgeous as it deepens the colors of your painting.
I’ve been painting for many years and I’m impressed that even now I’m still adding things to my checklist for what makes a truly completed work of art. Even after a painting has been created from start to finish, including all of the sketching, planning, collection of source material and inspiration that often goes on before painting even begins, and all the steps from laying down ground color to the finishing glazes, there are still these things to do:
- Final touch-ups and tweaks.
- Make sure I’ve signed the artwork.
- Attach a hanging wire to the back.
- Document the painting’s title, dimensions, medium, retail price, and control number in my inventory files.
- Using permanent marker, write the painting’s title and control number somewhere on the wooden part of the back of the painting.
- Photograph the work (sometimes having to wait for favorable lighting conditions.)
- Crop and edit the photo, save the high-res image, then re-size and save a smaller version for use online.
- Upload the image to my website.
- Blog about the new artwork, and also share the image and/or blog post on Facebook, Twitter, etc.
And now, also:
- Isolation coat
- Varnish
After this point, if the finished painting is being shipped to a buyer or a gallery, I need to acquire packing materials, safely pack the artwork (which is often a time-consuming project, especially for large paintings) and transport it to the shipper.
At this moment I have 348 documented paintings in my inventory file. I estimate that I’ve easily made more than 400 paintings as an adult (and many more as a child), as I didn’t start documenting them reliably until 2005. The above self-imposed checklist may give you an insight into where a big chunk of my time goes. Although the creative process and the actual painting process are both a lot of work, much more than that goes into creating truly “finished” artwork that is ready to sell and hang in any setting. I paint on gallery-wrapped surfaces, meaning my paintings continue from the face onto the edges of the surface, eliminating the need for a frame. But for many artists, deciding on the right frame, and buying or building a frame are also part of the process.
I hope you can see the pride I have in the quality of my work. While all these details can be tedious, there is also great pleasure in making objects that are not only creatively designed and beautiful, but also of high quality, using archival materials, excellent craftsmanship, and thorough documentation to preserve their value even long after I leave this world. As the years go by and I continue to learn, these things are improving alongside my technical painting skills.

And I still feel I have so far to go. I can’t wait until I reach 500 documented paintings. I’ve been looking forward to that milestone for a long time!
Edited to Add: Painters: check out this checklist of things you can do to ensure the longevity of your artwork.
Thanks, Cedar. I hope you don’t mind if I share this with a pal who just started painting in oil again after many years….
I love your work.
Thanks for the info. I found it really interesting.
mare
Very nice article. It was both informative and interesting. I love the little checklist at the end! All the more reason to appreciate what goes into a work of Art. Well done Cedar!
Hi Mare! Of course! You may always share anything from my website with anyone–my only request is always that you share the original links rather than copy-and-pasting. (Which you should do when sharing any blog, of course.) 🙂
Thanks Maureen!
Enjoyed the article-although I haven’t painted with oil yet it was very interesting and I learned several things!
Thanks
Enjoy your unique paintings and processes in finishing them. I have been questioning the importance of using an isolation coat between the paint and the canvas and have read many opinions against it. Recently I tried removing varnish from a painting and picked up some of the paint to my horror. Will start using that method from now on. I am an expressionist painter living on the East coast in New York. Thankyou
Thank you for your comment, Polly! I’m so glad this was helpful to you.